Welcome to week 1 of the Merry Christmas Mini Quilt Sew Along! Firstly thank you so much to everyone who purchased kits from us..oh my...it was a whirl of a few days getting them all packed and posted...thank you again!!!!! So without further ado, lets get sewing!
BEFORE STARTING Always Remember to:
1. Read all instructions before you begin.
2. RST means right sides together.
3. All seam allowances are 1/4”.
4. WOF means width of fabric.
5. If you need help, please do get in touch!
CUTTING INSTRUCTIONS
To make the Mini Quilt Top you will need a selection of festive pretties cut to the following sizes (If you purchased a kit, the pieces included were a slightly bigger than these measurements, so you will need to cut them to size):
A - (1) 3 1/2" x 6 1/2" rectangle
B - (9) 1 1/2" x 1 1/2" squares
C - (1) 3 1/2" x 3 1/2" square
D - (1) 2" x 6 1/2" rectangle
E - (1) 2" x 6 1/2" rectangle
F - (1) 2" x 9 1/2" rectangle
G - (4) 2 3/4" x 2 3/4" squares
H - (1) 2 1/2" x 5 1/2" rectangle
I - (1) 2 1/2" x 3" rectangle
J - (1) 2" x 10" rectangle
K - 10" piece of Ribbon
PIECING INSTRUCTIONS
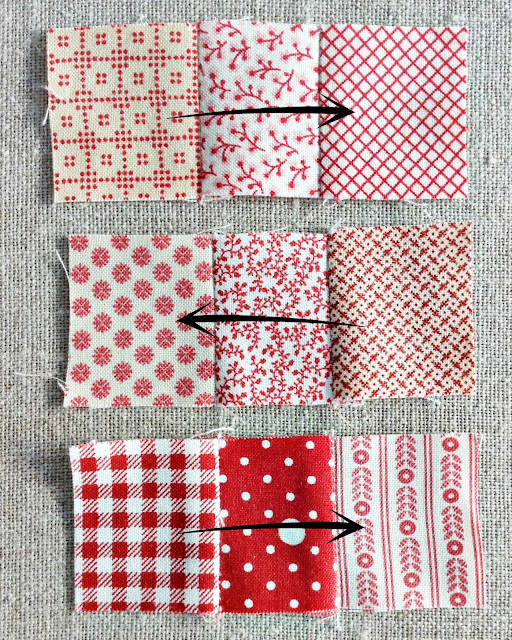
To piece the mini quilt top we're going to work in sections. First off we're going to make the 9 Patch from the nine Fabric B - 1 1/2" squares.
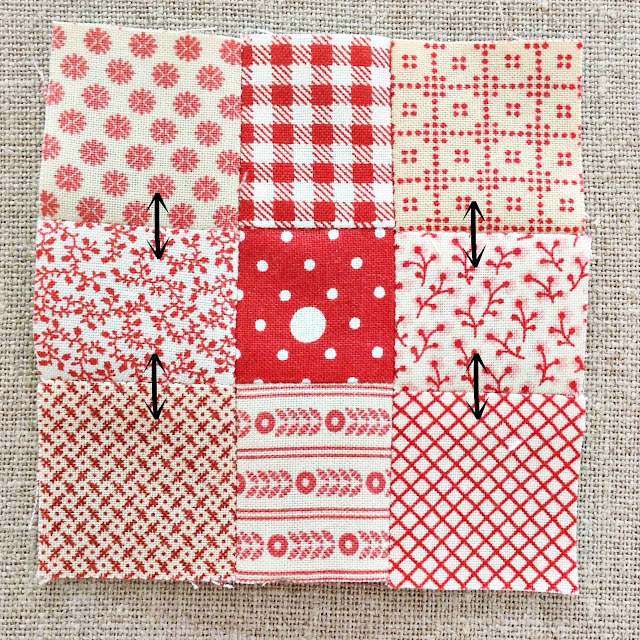
Lay them out in 3 rows of 3 squares. With RST, sew the squares together into 3 rows. Press the seam to 'set' the stitches (do this for all sewn seams throughout the tutorial), then press the seams on each row in alternate directions (as indicated by the arrows), this will help to nest (lock) your seams together when joining the rows in the next step.
A Little happy tip......You may want to have a look at THIS TUTORIAL, which has close ups of the seams nesting, it also shows how to chain piece, a fabulous technique that speeds up machine piecing no end!
With RST, sew the three rows together, carefully nesting the seams so that you can get nice matching corners. Press the seams open. This unit should measure 3 1/2" square.
With right sides together, sew your 9 patch unit to the Fabric C square. Press the seam towards Fabric C. This unit should measure 3 1/2" x 6 1/2"
With RST sew Fabric D rectangle and Fabric E rectangle together. Press seam towards Fabric D. This unit should measure 3 1/2" x 6 1/2".
With RST, assemble these two units together. Press seams towards the lower section. This unit should measure 6 1/2" x 6 1/2".
With RST, sew Fabric A rectangle to the 9 patch unit. Press the seam towards Fabric A. This unit should measure 9 1/2" x 6 1/2".
Centre the ribbon on top of the right side of the Fabric F rectangle and as close as you dare, sew along the upper and lower edge to secure in place. (I did not pin the ribbon, I held it in place with my hands, you may find that the ribbon particularly if its woven, may have a different tension to the fabric, but as you sew, the machine will sort that out for you.)
With RST, sew the four Fabric G 2 3/4" squares together, press seams open. This unit should measure 2 3/4" x 9 1/2".
With RST, assemble the ribbon unit to the Fabric G square unit, press seams towards the ribbon unit. This unit should measure 4 1/4" x 9 1/2"
Finally with RST, assemble the top of the mini quit to the bottom of the mini quilt. Press seam towards the bottom unit. The mini quilt top should measures 9 1/2" x 10 1/4".
Next time, I'll be sharing some different options for applique, so you can decide how you want to applique the Christmas Tree. I'll also be sharing what method I used for basting and stitching the little hexies.
Mum (Penny) and I would love to see your progress, so please do use the hashtags, so we can take a peek!
#alittlehappysewalong or/and #prettyfabricsandtrims
Happy Stitches!


Thank you for sharing this sew a long. It's so sweet!
ReplyDeleteHad a lots of fun with week one...can't wait for week two. Using up scraps for mine. Thank you. X
ReplyDeleteThanks for sharing this sweet Christian sew along.
ReplyDeleteXXX Marja
I Love it!!!
ReplyDelete